
If you are anything like me, you’ve probably spent more time fixing Claude’s output than actually using it. Here is how I stopped.
By the end of this article, you’ll see how I built a Claude Projects setup for content creation. One that produces surprisingly human-sounding first drafts and cut my newsletter production time to under 30 minutes.
The old workflow
Last year, I took over a fortnightly newsletter. Every edition followed the same process: choose a theme, sift through the company’s blog, pick three relevant articles, and craft a ~400-word newsletter. To speed things up, I used Claude to generate the first draft.
Back then, I relied entirely on regular Claude chat.
The first edition was satisfactory. The problems started when I tried to repeat the process. I would open a new chat, paste in the same prompt and references, expecting similar result.
Instead, the output often looked like it had been written by someone else entirely.
I had to rebuild the context from scratch every single time. Eventually, I realized I could have written the newsletter myself in the time I was spending going back and forth with Claude.
The experience eventually pushed me to learn how to use Claude Projects and redesign the entire workflow.
What is Claude Projects?
Claude Projects is a dedicated workspace within Claude where you teach it about a topic once, so you don’t have to repeat yourself every time. Unlike chat, it retains your instructions, rules and reference materials across every conversation.
Think of it like hiring an assistant. Instead of explaining your business, writing style, and preferences every day, you give them a folder containing all that information. From then on, they already know the context whenever you talk to them. Claude Project is that folder.
You don’t need a paid plan to try Projects. The free tier lets you create up to five Projects, which is more than enough to experiment with the feature.
Claude Project vs Chat: Quick Comparison
| Feature | Claude Chat | Claude Project |
|---|---|---|
| What is it? | A normal chat with Claude. | A workspace for a specific task. |
| Context Window | Remembers only the current chat. | Remembers files and instructions in the project. |
| Files | Upload again in new chats. | Upload once and reuse. |
| Instructions | Set for one chat. | Used in every chat in the project. |
| Best for | Quick questions and simple tasks. | Long-term work and repeat tasks. |
| Think of it as | Talking to a new assistant every time. | Giving an assistant a folder to keep and use. |
How to write Claude Project instructions that actually work?
Claude Project instructions are a permanent set of rules that live inside your Project. Unlike a chat prompt, you write them once and they apply automatically to every conversation within that Project. Claude reads them before it reads anything you type.
Get them right and everything that follows is consistent. Get them wrong and you’ll be firefighting every session. Here is how I created mine.
Step 1: Upload a reference document
The first thing I added to my Project was an actual newsletter edition I was happy with. Along with that, I uploaded a few samples of my own writing across different formats, including old articles, LinkedIn posts, and even rough notes. Together, they gave Claude a feel for my tone, writing style, and the phrases I naturally use.
This step matters because the files you upload become part of the context Claude can draw from. In a Claude Project, these files live in what Anthropic calls the knowledge base. Claude reads this material before responding, which makes its outputs far more consistent.
So instead of trying to interpret vague instructions like “write conversationally,” it has real examples to anchor to. It is the difference between telling someone your taste in food and just taking them to your favorite restaurant.
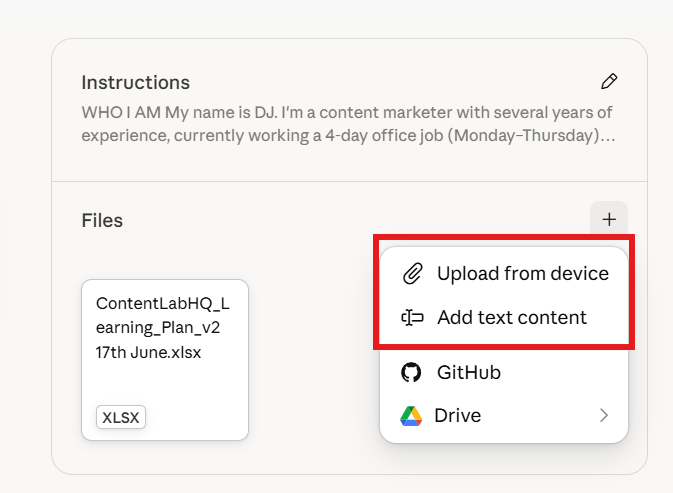
Here’s where you’ll find the option to add files to your Project’s knowledge base. To add your reference material, click the + button in the Files section and upload your documents or paste text directly.
Step 2: Define your audience specifically
Generic audience descriptions produce generic output. The more specific you are about who is reading and what they actually need, the better Claude calibrates its tone and content.
Instead of just saying “HR professionals.” I was more specific: “The audience is HR managers at India-based small to mid-sized businesses. These are practical people dealing with real hiring, retention, and people management problems. They don’t have time for theory.”
That level of specificity changes how Claude writes every sentence.
Step 3: Set the tone with a clear analogy
Tone is the hardest thing to specify because it’s subjective. While uploading a reference material gets Claude partway there, it still needs explicit directions on tone. Otherwise it will make assumptions if you leave gaps.
Adjectives alone are weak. “Professional” and “conversational” mean different things to different people. The more effective approach is to pair descriptors with a clear analogy Claude can anchor to.
I used: “Conversational, peer-to-peer. Like a knowledgeable colleague, not a brand. Direct and a little opinionated. Take a position.”
The analogy does the heavy lifting. “Like a knowledgeable colleague” tells Claude far more than “professional but approachable” ever could.
Step 4: Write your hard rules
This is the most important step. Every writer has things they hate. Claude has things it defaults to. Those two lists will overlap, and that overlap is where the tug of war between you and AI begins.
Write down everything Claude does that you always end up fixing. Then ban it explicitly.
Mine included: “No em dashes. Ever. No rhetorical contradiction framing like ‘That’s not X, it’s Y.’ No framing lines like ‘Let’s dive in’ or ‘Let’s break it down.'”
The specificity is the point. “Write naturally” is not a rule. “No em dashes, ever” is.
Step 5: Lock the structure
If your output needs to follow a consistent format every time, don’t leave it to Claude’s judgment. Write it out exactly.
I specified everything: two subject line options, two preview text options, a banner headline, an “inside this issue” teaser, three numbered sections each following the same pattern, and a closing action block.
The result is that every edition comes out in the same shape, regardless of the source material going in.
What Should Claude Project Instructions Include? (My Exact Prompt)
Here is the full set of instructions I built for the newsletter Project. This took a few sessions to get right and still gets tweaked occasionally.
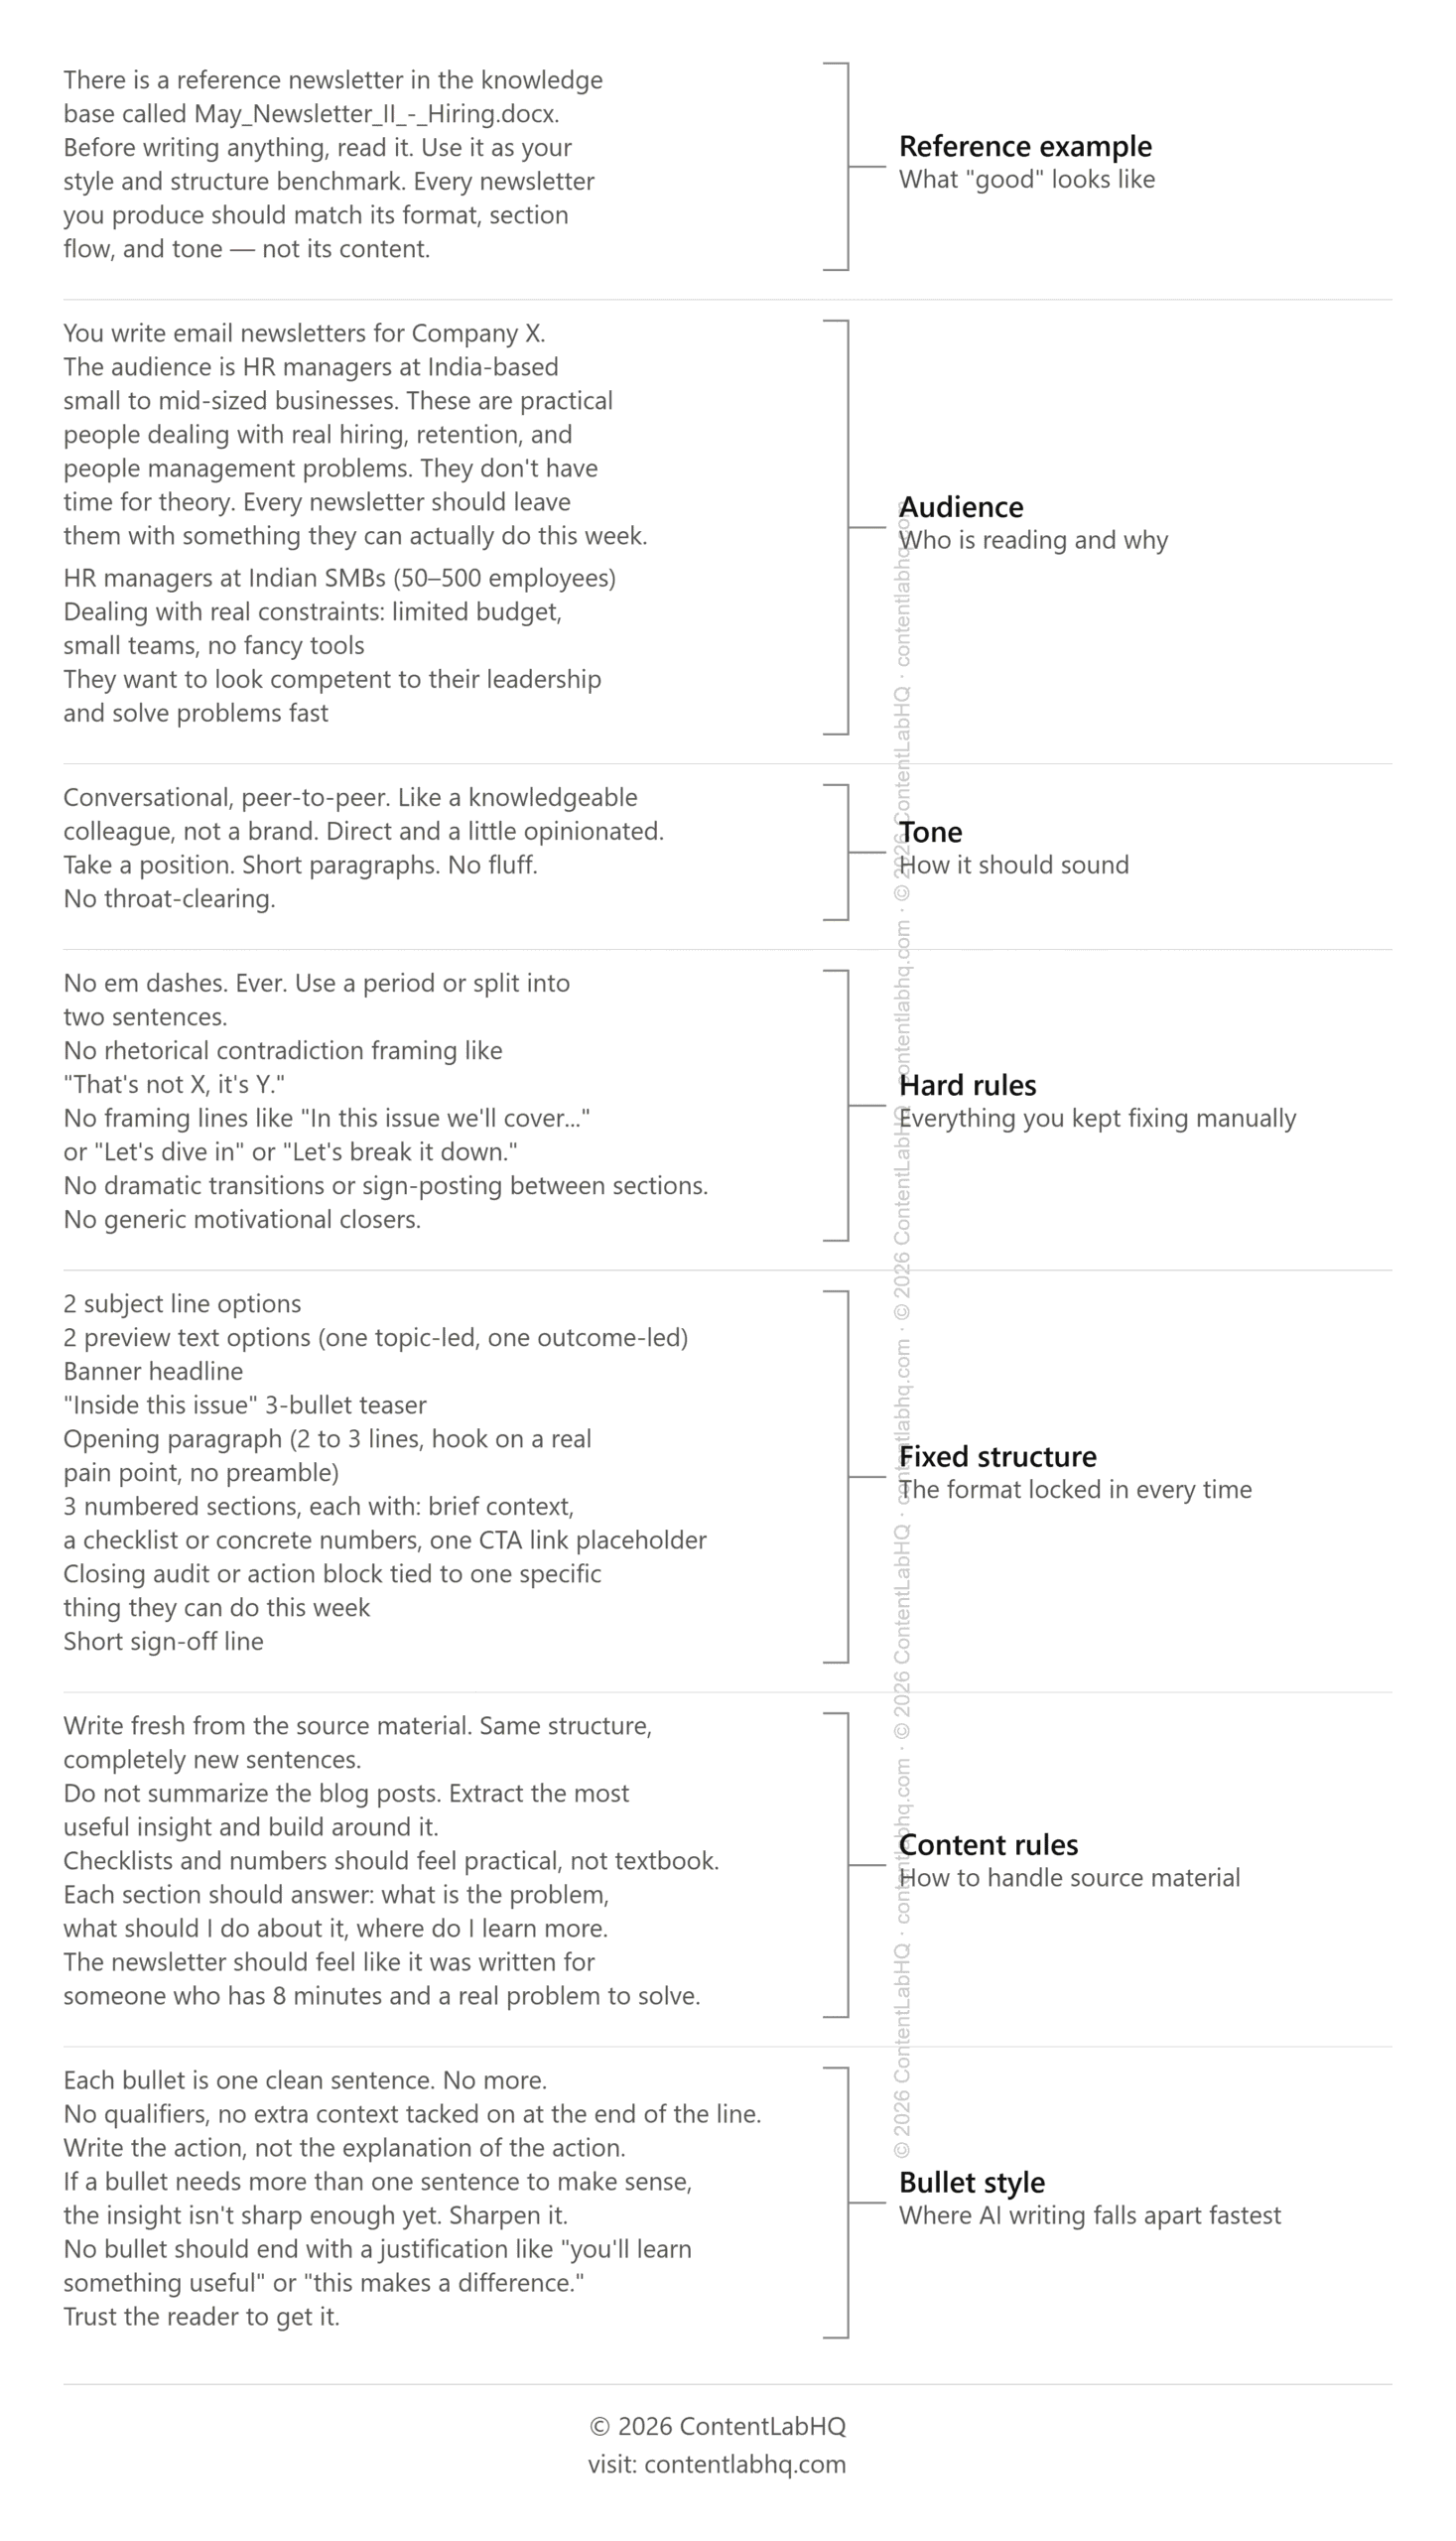
A quick note before you copy this. These instructions were written for a specific newsletter, a specific audience, and a specific format. The structure of the prompt is what’s worth borrowing. The details, including the audience, the tone descriptors, the hard rules, should reflect your own context. Start here, then make it yours.
What the Workflow Looks Like in Practice
The old process was slow and frustrating. Constant manual intervention meant I never got the full benefits of automation. The workflow was automated in name only, and the time spent fixing outputs occasionally delayed the newsletter itself and everything that depended on it. Setting up the Project finally delivered on the promise of automation. I now had a scalable system that could produce consistent output without constant hand-holding.
Here is what my current workflow looks like in practice.
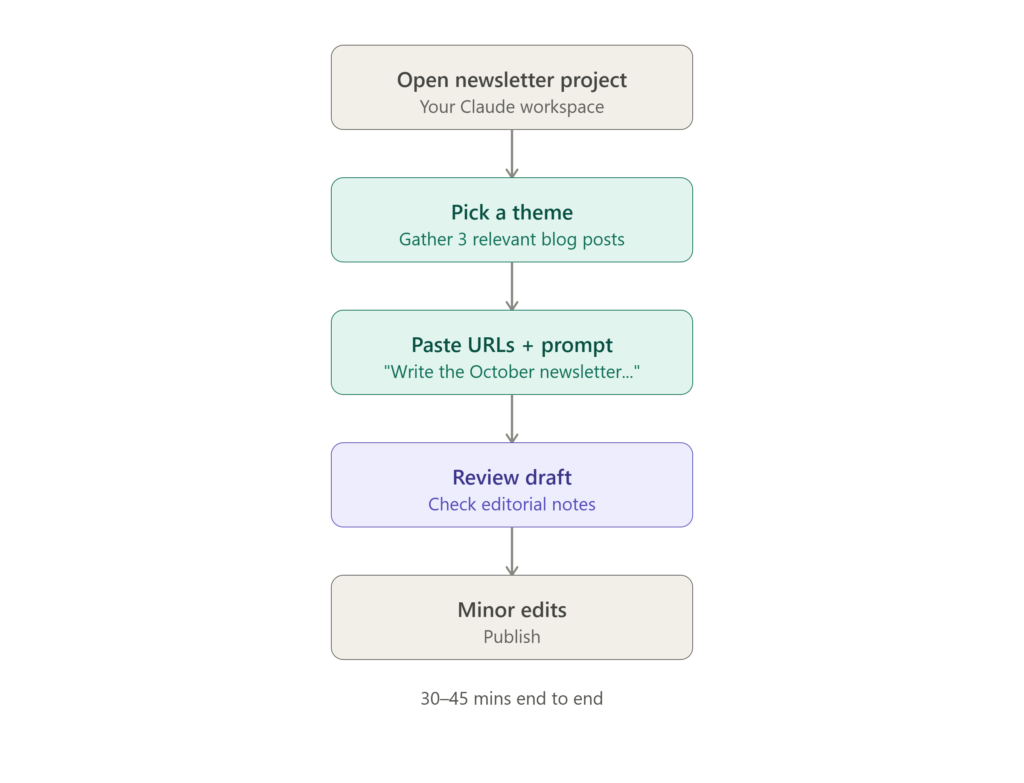
Step-by-Step:
- Open the newsletter Project.
- Pick a theme and gather three relevant blog posts.
- Paste the URLs into the chat with a simple prompt: “Write the October newsletter based on these articles.”
- Review the draft and editorial notes.
- Make any minor edits and publish.
End-to-end, the process takes about 30 to 45 minutes, including review time.
The Results — What Changed and What Didn’t
The biggest change has been consistency.
Before the Project, the newsletter was often a last-minute scramble and sometimes missed its deadline. Since implementing this workflow, every edition has gone out on time.
Production time has also dropped dramatically. What used to take better part of the day now takes 30 to 45 minutes, regardless of how busy the week has been or how much energy I have left.
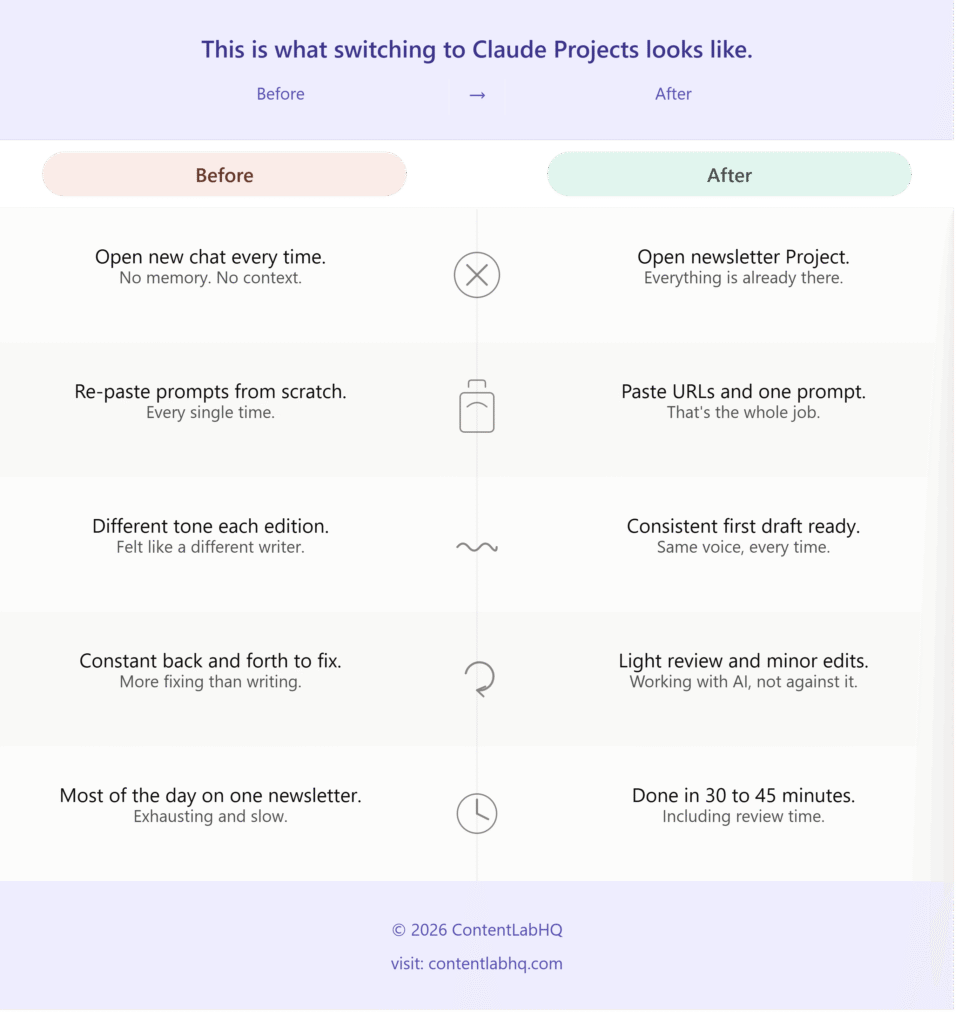
The first draft is also far more usable. I still review and edit every edition, but I’m now working from a solid starting point instead of playing a tug of war with AI.
The biggest benefit, though, has been the mental space. Because I’m no longer spending hours fixing the process, I have more time to think about the angle, the story, and the headline. That extra thinking time has translated into better performance. Open rates have nearly tripled, rising from 5 per cent to a consistent 12 to 15 per cent. Click-through rates are up by 55 per cent.
I can’t attribute those numbers entirely to automation. But by saving time and reducing friction, the Project has given me more room to be creative, and that creativity is showing up in the metrics.
The One Thing You Can Steal This Week
You do not need to build a full Claude Project this week. Start smaller.
Open a blank document and write down every single thing you end up fixing whenever Claude produces something for you. The em dashes it insists on. The framing lines you always delete. The tone that feels slightly off. The structure it defaults to that is never quite right.
That list is your first set of Project instructions. Not a prompt, not a template you borrowed from someone else. Your actual frustrations, written down as rules.
Once you’ve gathered the right examples and instructions, your Claude Project becomes a reusable system for content creation.
This week, do just these five things:
- Keep a running list of everything you fix in Claude’s output.
- Turn those fixes into instructions.
- Find one piece of writing you want Claude to imitate.
- Add both to a Claude Project.
- Run a real task through it and note what still needs fixing.
Thanks for sticking with me. If you end up building your own Project, I’d love to hear how it goes. See you next time.
Frequently Asked Questions
What should Claude project instructions include?
At minimum: a reference document to imitate, a clear audience description, tone guidance with a concrete analogy, hard rules for things Claude defaults to that you want banned, and a fixed structure for your output. The more specific each element, the more consistent the output.
Can Claude Projects be used for email newsletter creation?
Yes, and it is particularly well suited to it. Newsletters have a repeatable format, a consistent audience, and a fixed tone, which are exactly the kind of constraints that Claude Project instructions are designed to hold across every session.
How do I get consistent output from Claude Projects?
The instructions are where consistency is built. Upload a reference example of output you are happy with, write explicit hard rules for everything Claude does that you always end up fixing, and lock the structure so the format never varies. Consistent input produces consistent output.
What is the difference between a Claude Project and a regular Claude chat?
A regular chat has no memory of previous conversations. Every new chat starts from scratch. A Claude Project retains your instructions, reference files, and context permanently, so every conversation in that Project starts from the same baseline.
How long does it take to set up a Claude Project for content creation?
The Project itself takes under five minutes to create. Writing effective instructions takes longer and expect a few sessions of iteration before the output feels right. Most of that time is spent identifying your hard rules and finding a reference document that genuinely represents what good looks like for you.